Category Archives: General Blog Posts

Pencil and Paper Activities

Now that we will be inside for a week, it is time to pull up a chair, pour a hot chocolate or a cup of tea, and grab a pencil and paper to play these games that target a whole variety of skills! These activities vary in difficulty, and there is something here for all ages.

Wacky Characters

How many players: 2-3

Skills targeted: Flexible thinking, turn taking, fine motor skill, idea generation

How to play:

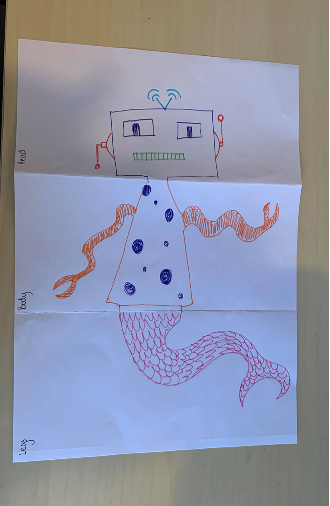
Begin by folding your page into thirds, and marking a ‘neck’ and ‘waist’. Label if you need.  

Each player completes a section of this picture, without looking at other components. When each player finishes, they fold away their section and open up the space for the next player. If playing with only 2 people, someone can go twice. Remind players to look at the marked neck and waist to see where to start from to make sure pieces connect.

Once all three parts are connected, open the picture to reveal your creation!
What to encourage:

  • Using a variety of colours
  • Appropriate pencil grip
  • Thinking outside the box, what could we do differently? E.g. wheels for feet.
  • Letting everyone have a turn and think of their own ideas

Extension:

Think of a name for your character. Write a profile about them, what do they like? What do they eat? Where are they from?

Dots and Dashes

How many players: Works best with 2, but you could do up to 4 with a big grid!

Skills Targeted: Turn taking, fine motor skill, problem solving, practicing reacting to winning or losing points as a good sport.

How to play:

Start by drawing a grid of dots, at least 4 x 4. The bigger the grid, the longer the game!

Players take turns using a line to connect two dots. One line, then the next player’s turn. It can be helpful for each player to use a different coloured pencil.

If a player completes a box on their turn, they put their initial in it, and get an extra turn to make a line. This may repeat several times, a player may win several boxes in one turn. In the example below, blue completed the box, so they have included their initial, and made an extra blue line. It is now green’s turn.
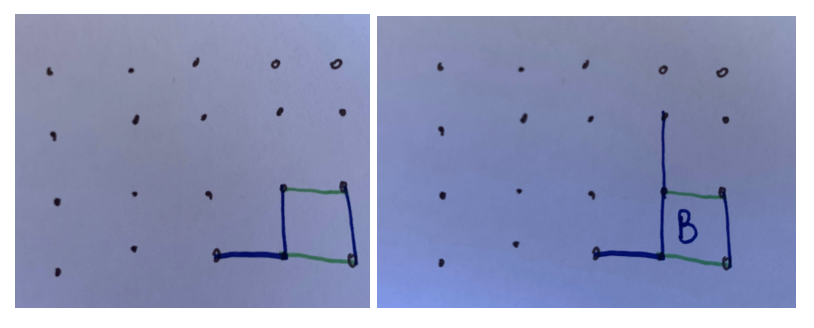
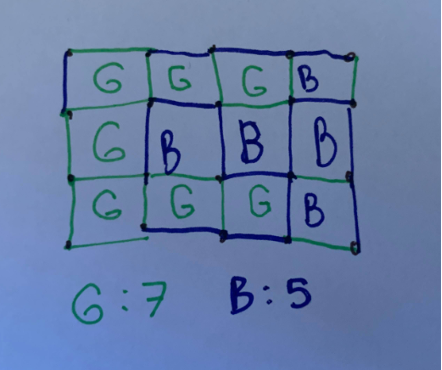
Once the board is complete and no more lines can be drawn, count the number of boxes each player has. The most boxes wins!
What to encourage:

  • Using kind words with other players
  • Thinking about what the other player might do based on our move
  • Letter formation
  • Thinking about how other players feel when they win/don’t win

Sprouts

How many players: Between 2 and 6 works best

Skills Targeted:Fine motor skill, pencil skill

How to play:

Start by drawing as many dots as there are players, plus one more (e.g. 3 players = 4 dots, 5 players = 6 dots). The dots can be anywhere on the page!

Each player chooses a colour. On their turn, they can draw a line in their colour. Their line can either:

  • Connect 2 dots to each other
  • Connect 1 dot to itself

However, the dots can only have 3 lines coming off them at any point.

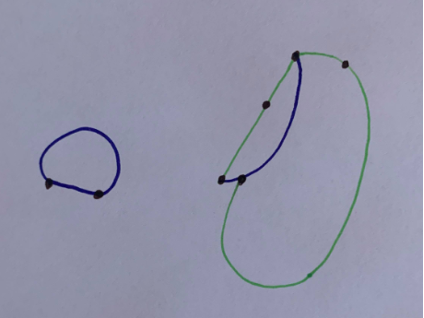
E.g. Adding a loop here is allowed:
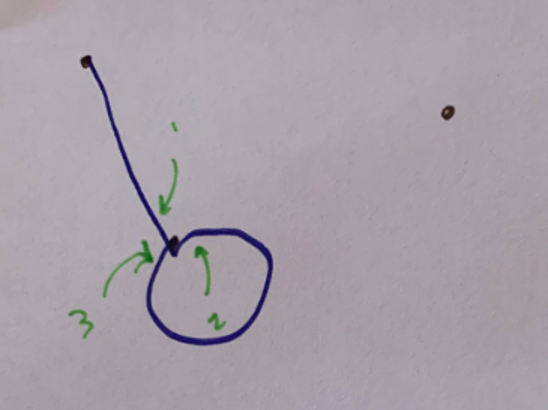
But not here because there would be 4 lines:
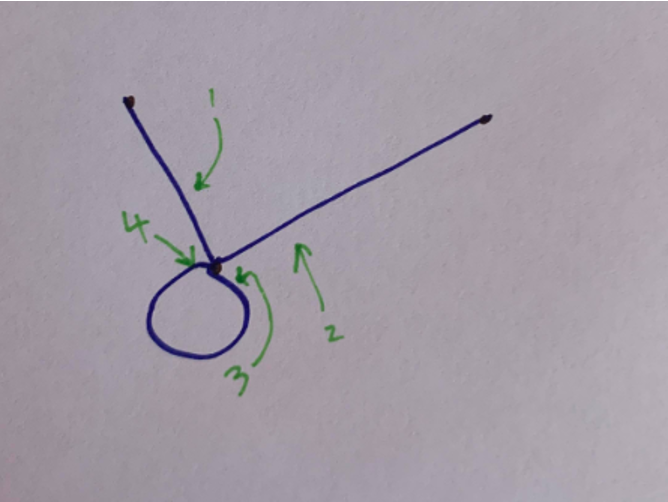
Once the player has added their line, they place a dot anywhere on the line they like. Then the next player makes a move following the same rules.

Lines may never cross each other.

At some point, it will become impossible to add a line following the rules. The last player that drew a line wins!

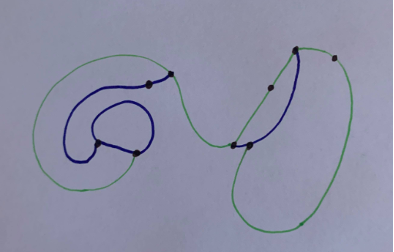
Example game:

In this example, blue made the last possible move so they win! No other lines can be made as every dot except 1 is full (3 lines), except for one. The player cannot make a loop touching that one as it already has 2 lines.

What to encourage:

  • Drawing lines without lifting the pen
  • Planning path before drawing it
  • Squeezing through small spaces

Adjustments:

Players might find it helpful to put a cross through dots once they are full, to make it easier to see where is possible.  

Pass the picture

How many players: As many as you like! Best with 4+ players

Skills Targeted: Pencil control, visual motor integration, critical thinking, handwriting

How to play:

Begin with as many squares of paper as there are players. Each player gets a piece of paper.

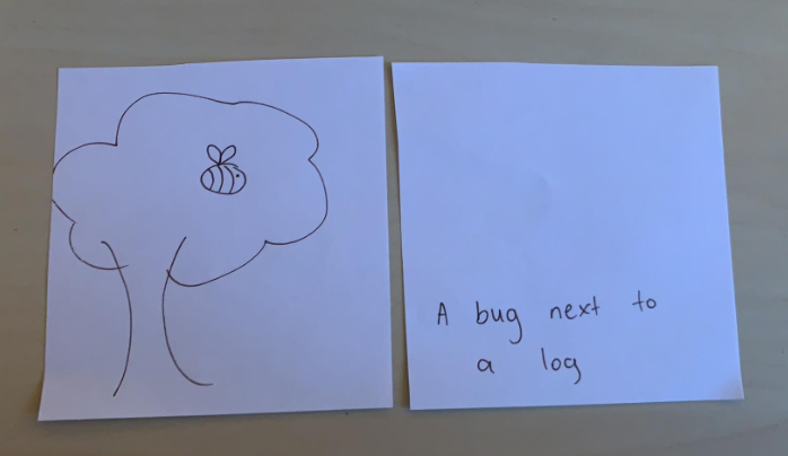
The first player draws a picture. The more complicated the picture, the trickier the challenge will be! They pass it to the next player.
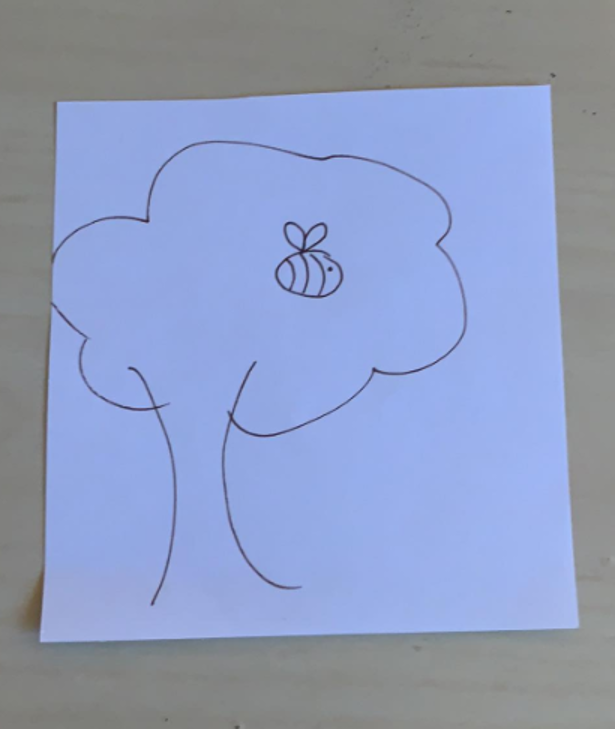
The next player writes down what they think was drawn, and places their square over the previous. They pass it on.

The next player draws what is written on the square they see. They place their picture over the writing.
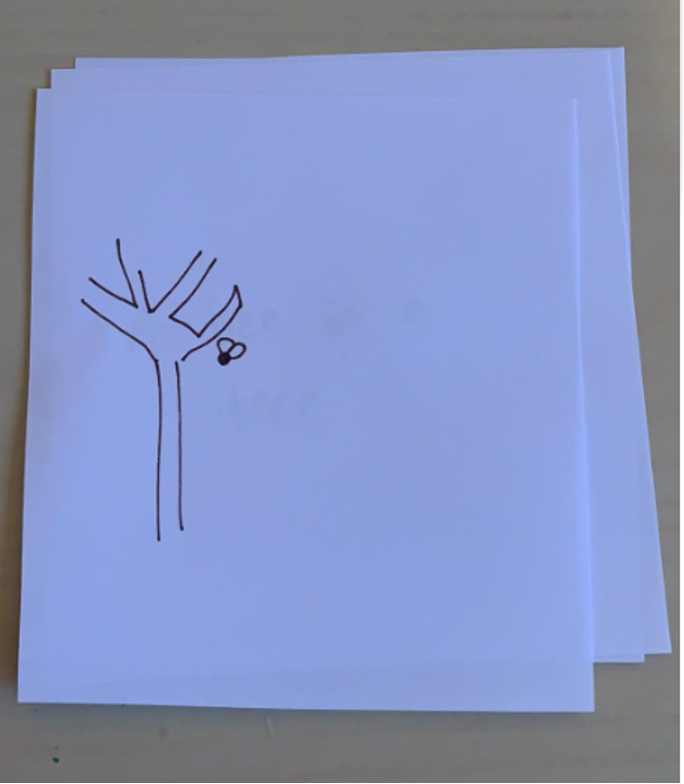
Play continues until we reach the last person. Then we compare the first picture, with the final piece of writing or picture, to see how close the message is!
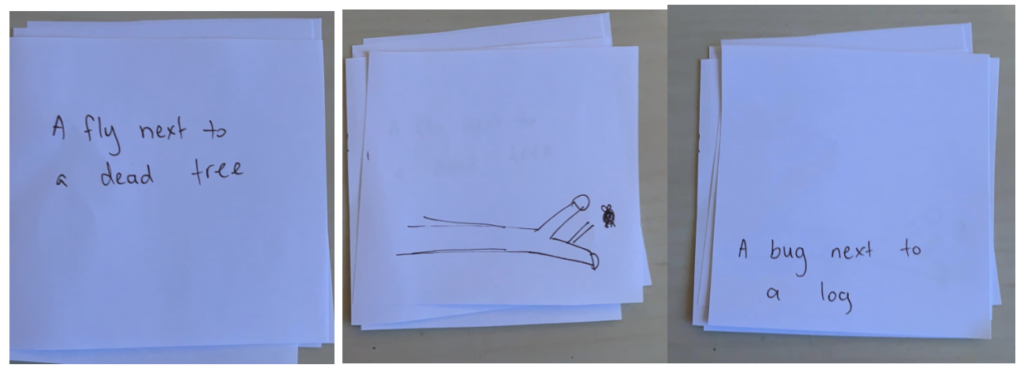
What to encourage:

  • This game can be used to practice flexible thinking! First play it trying to make the pictures and words as close as possible. Then play it trying to branch out as much as possible, trying to make the end result as far from the original as possible!

Adjustments:

If players find this challenging, using coloured pencils can make it a little easier.

It may be helpful to draw lines for players who are writing.

If you and your child are looking for a really challenging pencil and paper game, this is a detailed explanation of pencil and paper battleships, fantastic for a critical thinking and spatial thinking challenge! http://www.papg.com/show?1TMC
KICKBricks

Ever wondered how you can mentally and physically occupy your child for hours on end?
KICKbricks are the answer!

Playing with blocks is a common childhood experience and promotes integrated learning across a variety of different developmental areas (Phelps & Hanline, 1999). KICKbricks are a fantastic and incredibly versatile construction toy that can guarantee hours of fun, whilst also helping to develop a range of physical, mental and social skills. KICKbricks are large, soft foam blocks that can be built into whatever you like then pushed down again. Being lightweight, they are suitable for most ages and will not hurt if they come crashing down on top of you. They come in a range of colours and are an awesome addition to any family and have a range of benefits.

Benefits of KICKBricks

Socially

Whether your child prefers to play alone or with others Kickbricks are appropriate for either situation. Object related activities like building blocks can promote social and imitative behaviours (Brown and Murray, 2001Stahmer et al., 2003Lee et al., 2017), as well as joint attention and communication with another person (Iannaccone, Savarese & Manzi, 2018). It can also help to develop foundational social skills like turn-taking, waiting and sharing (Raising Children, 2017), as well as assist in developing cooperative play and teamwork skills.

Physically

The KICKbricks can also be used to help develop both fine and gross motor skills. For younger children, the wide bricks can assist with developing grasp and manipulation skills, spatial awareness, and muscle strength and coordination (Achwal, 2018) to place the blocks on top of the tower. For older children, challenges can be used with the bricks to create targets for throwing or kicking practice and can be used as obstacles to balance along or jump over.

Mentally

Kickbricks are also a fantastic way to stimulate the mind and help build cognitive skills. For younger children, the blocks provide opportunities for using creativity and imagination for object substitution (Achwal, 2018). Whereas for older children, the multicolour element of the bricks is also a great way to develop visual perceptual skills by creating patterns and designs, as well as building executive functions like planning, sequencing and problem-solving skills (Achwal, 2018; Iannaccone, Savarese & Manzi, 2018).

Allie Deayton
Occupational Therapist

References

Phelps, P., & Hanline, M. F. (1999). Let’s play blocks! Creating effective learning experiences for young children. Teaching Exceptional Children32(2), 62-67.

Iannaccone, A., Savarese, G., & Manzi, F. (2018). Object use in children with autism: building with blocks from a Piagetian perspective. In Frontiers in Education (Vol. 3, p. 12). Frontiers.

Brown, J., and Murray, D. (2001). Strategies for enhancing play skills for children with autism spectrum disorder. Educ. Train. Ment. Retard. Dev. Disabil. 36, 312–317.

Stahmer, A. C., Ingersoll, B., and Carter, C. (2003). Behavioral approaches to promoting play. Autism 7, 401–413. doi:10.1177/1362361303007004006

Lee, G. T., Feng, H., Xu, S., and Jin, S. J. (2017). Increasing “object-substitution” symbolic play in young children with autism spectrum disorders. Behav. Modif. doi:10.1177/0145445517739276

Achwal, A. (2018). What Preschoolers Can Learn From Block Play. Retrieved from Importance of Block Play in Early Childhood Development (firstcry.com)

Emotional Regulation In Older Kids

Emotions! Everyone experiences them every single day.

Emotional regulation is the ability to manage emotions and behaviour to match the demands of the situation. This includes the ability to calm yourself down when you are upset, resist impulses, adjust to changes and handle frustration in a socially appropriate way. These skills allow children to direct their behaviours towards a goal.

What skills are involved in emotional regulation?

  1. Identifying specific emotions you are feeling
  2. Identifying specific emotions in others
  3. Being able to start and continue to work towards goals even if feeling anxious
  4. Tolerating awkwardness
  5. Ability to have intimate conversations
  6. Staying strong when someone is pressuring you
  7. Being able to manage your own emotions
  8. Being able to manage other people’s emotions
  9. Resisting going over the top with positive emotion
  10. Delaying gratification

Children begin learning emotional regulation from a very young age. In some children, their emotions are huge, strong and explosive. In others, they have a slow build up before exploding over something small that tipped them over the edge. No matter how our kids experience emotions, it is important that we help them learn to handle their feelings and find ways to express these appropriately.

There are times throughout development where our brains experience emotions more intensely – this is due to hormones! Did you know that the brain experiences these hormones first around the age of 2 (think terrible two’s!), and then again around puberty (and think moody teenagers!)

People often believe that emotional regulation needs to be taught when our kids are young – teach them the strategies early and they will carry these through life. It is definitely important to teach our children how to manage and regulate their emotions early, but it is never too late! Research shows that major changes in the brain occurs during adolescence, and we can support them to develop healthy emotional regulation strategies that they can carry throughout adulthood

How can we help our older kids to develop healthy emotional regulation strategies?

  1. Modelling specific strategies, they can use such as positive self-talk, meditation, taking a break and exercise, talking about it with a good listener
  2. Create a safe space to talk and provide a warm, responsive relationship. Talk about what emotions are and what purpose they serve
  3. Structure the environment where possible. Try not to set them up to fail where there are multiple triggers
  4. Try to see the world from their point of view – understanding how they feel and why is so powerful
  5. Use visual supports
  6. Journaling/drawing
  7. Develop your own empathy response and use it with them
  8. Give them the opportunity to practice their new skills and monitor/reinforce progress, even if it is something small
  9. Teach that positive emotions also need to be regulated not just negative emotions
  10. Remember not to be dictated by culture/gender bias – the idea that boys shouldn’t cry and girls are more emotional is outdated

If you have any concerns around your child’s emotional regulation development, please do not hesitate to give us a call on 9404 0338 to see if we can help.

Sharni Wright

Occupational Therapist

My NooK Play Sofa

What is a NooK?

A NooK is a modular sofa designed to be played with! The NooK can be used to foster the imagination of children while developing their gross motor skills, construction play skills and executive functioning skills. The NooK is made up of 10 individual pieces which can be moved and balanced to make endless fun creations.

How can I use my Nook?

NooK’s are extremely versatile and can be used to make countless combinations. The NooK is beneficial to promote imaginative play, constructive play, executive functioning skills and gross motor skills. Moving the NooK is also great heavy work for children who need a little bit of extra support to regulate their bodies.

Imaginative Play
The NooK fosters imaginative play by enabling children to create their own worlds. Imaginative play is important for child development as it promotes confidence, self-esteem, communication, and the beginnings of social awareness.

Construction Play
The NooK helps kids think ‘outside of the box’ by using different shaped and sized cushions to create what they envision in their heads. Construction play helps develop executive functioning skills such as problem solving, planning, task initiation and decision making. It also promotes resilience and independence.

Prepared by Georgia Goodwin, Occupational Therapist

Creative and fun ways to start and end a day of school!

School takes up quite a big portion of the day and plays such a big part in the lives of children and their families. Sometimes, it can be difficult to fit in other activities and to encourage interaction with our surroundings outside of technology before and after school, however, engaging with our environment and taking time out to engage kids in different activities can assist with a child’s regulation, not to mention it can also further develop a wide range of gross and fine motor skills, sensory interaction and behavioural skills. Some tools and strategies can also be utilised to help assist with organizational skills and transition to and from school. 

Listed below are some creative and simple ideas for activities and strategies for before and after school to assist with regulation, development of skills and organization: 

Schedules 

  • This can assist with routine and make transitions between tasks and steps easier 
  • Schedules can be written, visual, or a mixture of both  
  • It might include steps required for dressing sequence, packing our bag, morning routine, etc. 
  • Timetables outlining what is happening during the day or week can also assist those little ones who like knowing what is happening and what to expect after school or the following day!

Jumping and Crashing

  • Jumping outside on a trampoline can be super regulating for little ones and allow them to get out wriggles – this could be useful for both before and after school 
  • Little trampolines in the house are also a fun way to get out wriggles and energy without needing to go outside – accompanied with a crash mat or large cushion/bean bag to jump on to is even more fun and can provide pressure input! 

Bike Riding

  • Riding a bike is a really good way to work on gross motor skills and to interact with nature – it is a fun activity to do as a family as well! 
  • Even just sparing 10 or 15 minutes to go outside and ride around the street after school is a fun way to end the day  
  • If you are close to school you could even ride the bike home or to school in the mornings!  

Playground Equipment

  • Try getting to school 10 or 15 minutes early so your child can run around and play on the play equipment to get out energy before going into class for a morning of learning 
  • This may help them to concentrate and regulate more readily once inside and can also help with the transition into school without rushing around beforehand! 
  • The many activities and games possible on a playground can provide vestibular and proprioceptive input which some movement-seeking kids can really crave 

Sensory Play

  • Try colouring dried rice and pasta and placing in a tub with items hidden within for your child to explore and locate 
  • Use kinetic sand, play dough, paint to work with a variety of different textures – this is a fun way to play in the morning in the lead up to school and also to wind down in the afternoon 

Drawing and Colouring

  • Drawing is so beneficial for a wide variety of skills and is an activity that does not require many resources!  
  • Sit down with your child and have a go at drawing different shapes and objects to work on pre-writing skills or to further develop fine motor, visual motor and creative skills! 

Mindfulness Activities

  • Having some time out to focus on what is happening in the given moment can be so calming and therapeutic 
  • Try doing this after an energy-packed day or as a way to prepare for the day ahead 
  • Playing “dead fish” can be a fun and motivating way to keep the body still whilst encouraging thinking about the “here and now” 
  • This can also be through meditation, colouring, yoga poses and activities and so much more – even sitting with your child and listening to breathing, music or guided meditation can be really beneficial and assist with calming the mind and body 

For more information around these activities and for even more ideas to cater for your child’s specific needs, contact Building Blocks Therapy to schedule in an appointment! 

Learning to Tie Your Shoelaces

Learning to tie your shoelaces is a significantly challenging task in life, however it is a self-care task that can bring a great sense of independence and achievement for your child.

Tying shoelaces is a complex task that involves many different skills. Some of these include fine motor strength, finger isolation, bilateral coordination, attention, concentration, visual perception, working memory, visual motor integration and emotional regulation.

There are multiple different ways to tie your shoelaces. It is important to choose the method of shoe lace tying that will best suit your child. If your child struggles with bilateral coordination or finger strength which is required to hold the two loops, try using the single loop or push and tie method. See below different methods to tie shoelaces:

Below are some tips to help your child to achieve this milestone, increase independence and be successful in tying their shoelaces.

Tip # 1 – Backwards Chaining

  • Backwards chaining is especially beneficial for children who become frustrated easily or with a lack of confidence as it provides them with immediate success.
  • Backwards chaining involves completing all of the steps involved except for the last step of the process e.g. completing the final pull to tie shoelaces.
  • Once your child has mastered this final step then practice the second last and the last step e.g. pulling the lace through the hole and pulling the laces tight.
  • Continue this process working backwards through the steps until your child can complete all steps independently.
  • This technique involves you modelling and showing your child the steps involved and providing verbal instructions to assist with this learning and skill development. The shoe can be placed in lap or on table during this process (it does not need to be placed on a foot).
  • It is important that the child has mastered the step before moving on and that your child can also remember or use visual reminders to follow the steps involved.
  • This technique provides your child with immediate success which can encourage and motivate your child to continue learning this process.

Tip # 2 – Video Modelling

  • The use of videos can be beneficial especially for children who are visual learners. You can stop and pause the video at different steps and provide support and model these actions to your child.
  • There are a wide variety of different videos on YouTube with different methods including the double loop, single bunny ear and push pull.
  • There are also lots of videos with songs to help your child learn and remember the steps involved.
  • Below are some examples of videos you could use:
  • Tying Shoe Laces Song – https://www.youtube.com/watch?v=BeSkBOYUlag&t=67s
  • How to Tie your Shoe Laces – https://www.youtube.com/watch?v=Ygqs_UvjWyM

Tip # 3 – Different Coloured Laces

  • Using 2 different coloured laces in a shoe can be beneficial when learning this skill so that your child can easily see and distinguish the difference between the two laces. This is especially helpful for children who have difficulty with visual discrimination.
  • This can be done by cutting two different coloured laces and tying them together.

Tip # 4 – Practice, Practice, Practice!

  • Shoe lace tying like many other life skills requires practice.
  • Try not to practice this skill when you are busy or in a rush. Practice after school rather than in the morning when everyone is busy getting ready.
  • Remain calm and relaxed when practicing.
  • Model the process on your own shoes.
  • Continue practicing with shoe in lap or on the table not on foot. Shoelaces become tighter when wearing the shoe which makes it more challenging.
  • Consistency with the words you use is important e.g. bunny ears, loops, twists, knots etc.
  • Try to avoid using “right” and “left” side unless your child understands and is proficient at differentiating the difference between right and let sides.
  • Instead use different coloured laces to distinguish between the two different sides or place a sticker on your child’s dominant side and use “sticker” and “non-sticker” side.
  • Practicing with stiffer and thicker shoelaces first will be easier for your child before moving onto more elastic and thinner laces.
  • Use of videos or visuals to help with practice.
  • Can also try attaching two pipe cleaners (two different colours) to your child’s shoes. The pipe cleaners are stiffer than normal shoelaces and therefore can make it easier if your child drops or has difficulty holding the laces when making the loops, as the pipe cleaners keep their shape.
  • Practicing bow tying with your children with other activities is also great practice such as wrapping presents, tying ribbon in hair, tying ribbon on a doll or teddy etc.

Alternatives to Shoelace Tying

Some children may find the task of shoelace tying too challenging. If this is the case, this certainly does not mean your child will not be independent with the self-care task of putting their shoes on and taking them off. There are a variety of alternative shoelaces below that do not involve the tying process that may be beneficial for your child to still achieve this task and increase their independence.

If you feel that your child would benefit from occupational therapy sessions to work on the skills involved in the task of shoelace tying, please contact the Building Blocks Therapy Clinic for more information.

Carly Pettingill

Cutting Skills

Cutting skills are very important for a child’s fine motor skill development and often start at a young age.

Cutting skills are quite complex and it takes time and practice for children to develop and master this skill.

Using scissors correctly helps to:

  • Build hand and finger strength
  • Develop skills for fingers to work together
  • Independent movements of each finger
  • Increased hand and finger dexterity
  • Promote functional grasp
  • Increase focus and attention to a task
  • Promote bilateral coordination – necessary to hold scissors in one hand and hold paper in the other.
  • Promote eye-hand coordination – required when cutting along a line

Scissor skills can help build hand and finger strength, develop skills necessary for fingers to work together which is also required to promote a functional pencil grasp which can increase pencil control and overall handwriting.

Tips for Ensuring your Child is Using Scissors Correctly:

  1. Ensure your child is sitting appropriately on a chair and at a table (not slouching).
  2. Ensure thumb, index and middle fingers are through the scissor holes or thumb and middle finger with index finger on outside of scissors for support. There are different ways to hold scissors correctly depending on the scissors (see below).
  3. Practice action of opening and closing scissors prior to properly cutting paper.
  4. Ensure thumb is facing upwards when using scissors to cut paper.
  5. Encourage your child to hold the paper off the table with helper hand.
  6. Practice, practice, practice – start with practicing cutting straight lines and curved lines, progress to circles and spirals and basic shapes such as squares and triangles.

There are multiple different ways to hold scissors correctly depending on whether the scissors have round and oval holes. See photo below showing different ways to hold scissors depending on if scissors have 1 round and 1 oval hole, 2 oval holes or 2 round holes.

(OT Mom Learning Activities, 2019)

It is also important that left-handed children always use left-handed scissors as the blades are attached differently and impact the child’s ability to see the line or where they are cutting.

Scissor Skill Progressions:

  1. Learning to hold scissors (1.5 to 2 years old) – often using plastic scissors and opening and closing the blades using two hands.
  2. Opening and closing scissors (2 – 2.5 years old) – great time to practice with playdough and tearing paper.
  3. Once child has mastered opening and closing the scissors they can move on to snipping the paper.
  4. Snips paper moving forward (3 years old) – making snips in paper while moving scissors forward.
  5. Using helper hand (3 – 3.5 years old) – use of ‘helper’ / non-dominate hand to hold and turn the paper while cutting.
  6. Cutting straight lines (3 -3.5 years old) – moving scissors along a straight line, accuracy is still a work in progress.
  7. Cutting along curved lines (4 years old) – able to cut along a relatively wide curved line.
  8. Cuts circle shape (4 years old) – able to cut out circle shapes, accuracy is still a work in progress.
  9. Cuts square shape (4.5 – 5 years old) – a child can cut out a square shape.
  10. Cuts complex shapes (between ages of 5-6) – able to cut more complex shapes such as triangles and figures.

It is important to remember that these are approximate average age range to develop and master these skills. Some children may develop these skills earlier or later compared to the average age.

Tips if Your Child is Struggling with Developing Cutting Skills:

  • Use hand over hand assistance while your child is starting to learn this skill.
  • Use spring loaded scissors as this can help with the action of opening the scissors.
  • Highlight the line where child needs to cut so that this stands out for them.
  • Using play dough scissors and snipping play dough when staring to learn the skill.
  • Holding playdough / paper for child so that they can focus on opening and closing motion of scissors.
  • Modelling this action for your child to watch and then copy.

References:

Dena Bishop. (2018). What are the benefits of cutting with scissors for young children?  https://www.continued.com/early-childhood-education/ask-the-experts/what-benefits-cutting-with-scissors-22719

OT Mom Learning Activities. (2019). Scissor Cutting. https://www.ot-mom-learning-activities.com/scissor-cutting.html

Growing Hands on Kids. (2018). Scissor Skills Development Checklist for Ages 2-6. Retrieved from https://www.growinghandsonkids.com/scissor-skill-development-checklist-for-ages-2-6.html

The OT ToolBox. (2019). Scissor Skills. Retrieved from https://www.theottoolbox.com/scissor-skills/

If you feel that your child would benefit from Occupational Therapy sessions to work on cutting skills, please contact the Building Blocks Therapy Clinic for more information.

Carly Pettingill

DIR/Floor Time Play Blog

Tips for playing with your kids who are 5 and under based on the DIR/Floor Time Model

  1. Follow your child’s lead
    • This is the best starting place for interacting with your kids!
    • Following your child’s lead gives you insight into your child’s interests, what brings them joy and what is meaningful to them. If we follow the child’s lead, we can start on their level and then playfully, respectfully and joyfully build their play skills and ideas from there

  2. Join your child’s world, then pull them into a shared world to build their interactions and play
    • By starting with respecting your child’s motivations you have now been able to peak your child’s interest and using that interest you can pull your child into a shared world where you are interacting and playing together
    • Being in a shared world and interacting together you are able to more readily support your child to
      • Learn to focus and attend
      • Learn to take initiative
      • Learn to have empathy
      • Learn to have back and forth communication through gestures and words
      • Learn to be creative
      • Learn to problem solve

  3. How do we practically put these 2 together?
    • If your child is spinning around and around in a circle, join them! Then build a shared world by playfully stopping them in front of your face, engaging in eye contact and laughter, then continue spinning and playfully stopping them
    • If your child is pushing cars around on a track, join them with another car! Then create a shared world and shared experience through doing a new action with the car, crash the car using silly loud sounds or make it jump over the track, extending their play ideas, tolerance of others and shared interactions
    • If your child is having tummy time and manipulating toys in front of them join them on the floor! Start by manipulating the object (soft toy, block, mirror etc) they are looking at, using lots of fun and silly sounds whilst playing. Then hide an object and return it with a big surprised sound to encourage joint attention and a shared experience

Summary

  • The first point of call is to use your child’s interest and follow their lead. Be mindful that a part of entering your child’s world is tuning into their pleasures, joys, challenges, personality and differences and accepting their choice of play
  • We want to make sure the experience is full of joy and pleasure for both parties. If the play experiences in becoming stressful, consider taking a break and evaluating why the play experience in no longer being fruitful
  • Encourage a shared world by adding to your child’s interest and by using a high affect i.e. big facial expressions, noises, sounds effects and actions to peak their interest and engagement

References

  1. FLOORTIME: WHAT IT REALLY IS, AND WHAT IT ISN’T, By Stanley I. Greenspan, M.D.
  2. What is Floortime?
  3. DIR Floortime courses

The DIR/Floortime model has identified 9 development capacities that children need to master in order to have the right building blocks of play skills and to not push your child outside of their developmental capacity. If you would like to know more about these capacities, please refer to the references above.